Tuesday, December 6, 2011

Cricut Weekly Challenge #46 Flower Fusion Challenge


Hi Friends and Fellow Crafters. This is my entry for the Cricut Circle Blog Weekly Challenge.

Weekly Challenge #46: Flower Fusion Challenge!

The Challenge: We all have them in one form or another . . . flowers! Most of the time we buy them in a package, use a few, tuck them away and then forget that we have them. This week’s challenge we want you to shop your stash and incorporate purchased flowers into your project, whether it’s a card, layout, home decor item, etc. Be sure to include atleast 2 Cricut Image Cuts on your project.
Rules and Guidelines: Circle Blog Challenges are open to Cricut Circle Members only. Your project must be newly created for this challenge and include atleast 2 Cricut Image Cuts. You must submit a project to be entered into the Challenge Prize Drawing. One entry per person, please.
How to Enter: Submit your entry using the InLinkz tool found at the bottom of this post. Please post your full name along with your entry. Entries are due by 9:00 pm MST on Thursday, December 8th, 2011.

This was an easy one for me because I have a ton of flowers. I love my paper flowers so much that my sweet Husband buys me Primas on Birthdays and Holidays. LOL!
Like most of my fellow crafters, (I'm guessing) I am still making Christmas cards. This is one I made with my Imagine, my Gypsy using the Imagine Application and I  finally played around in the Cricut Craft Room. That's how I created the Elegant Edges Loop Border on the top of the card.


The Details:
Cricut Gypsy and Imagine
Santa's Village, Christmas Wish and Snow Angel Imagine Art Cartridge,
Christmas Cheer, Joys Of The Season and Elegant Edges
Stickles, Tinsel Ribbon, Glitter Flowers, Ribbon,
Stamps from CTMH and Whiff Of Joy
Stampin' Up Tempting Turquoise Ink

This is one of my Mom's favorite cards so far. I admit, the Yeti is the sole reason I picked up Santa's Village. I loved the feel of this cartridge, but was willing to wait until later to order it, that was UNTIL  I saw the Yeti. My favorite character in Rudolph The Red Nosed Reindeer is the Bumble, and this guy was the closest die cut I have seen to him. I ordered it as soon as I could. LOL! One the cartridge arrived here, I couldn't wait to make something with him. I had been playing around with my Imagine application and had just made the Sleigh using Christmas Wish and Christmas Cheer. I also had an extra border that I had made in the Cricut Craft Room laying on my table. I had the background paper cut from another project that I had used the Snow Angel cartridge for. This background paper was too big for my project, but the perfect size for the card. It all just came together so nicely. My snowflakes on the front and inside are from Joys Of The Season. This is where my flower requirement came in. I've had these pretty glitter flowers in a tin forever. They were attached by a magnet glued to the tin and hanging above my craft table. I was "saving" them for who knows what? I had made the front of the card and was trying all these Prima Flowers on it, but nothing suited it. That was when I saw the tin and knew they would be perfect. I had the sentiment stamped already and just added some ink and stickles to the edges. That was when the stickles bomb blew up, and the next thing I knew, there were stickles everywhere! I even stickled the Yeti! LOL! It's a little hard to see in the pics, but it's there! I included the one buy I made on Black Friday, some tinsel ribbon from Michael's. It's pretty cool across the loop border from Elegant Edges.. I will definitely be on the lookout for this during the clearance sales. I want a few more colors, but I am trying to stay close to the spending ban. So far, no paper, a few cartridges, and some Distress Stains. Not too bad. I am still getting over my Stamp buying spree a few weeks ago. LOL!


The snowflakes are popped up. The flowers are sweet, aren't they? Here's the inside of the card. I used a Whiff Of Joy Sentiment, a Joys Of The Season Snowflake that was in my snowflake stash, some ribbon and another Glitter Flower. I'm pretty sure the paper is my My Mind's Eye, it was alone in a pile of Christmas Paper from last year. I could be wrong....


I think I may make a couple more of these. It's a cute card.


Thanks for stopping by my blog today. I hope everyone has been enjoying the Christmas holiday season so far. We have been busy trying to get our decorating and shopping done, but having some fun at the same time. I pray all my family, friends and crafting friends are happy and healthy throughout the Holidays!

Happy Crafting!
Colleen

Monday, November 28, 2011

Lili Of The Valley Anything Goes - Challenge 122


Hi friends and fellow crafters! Today's Christmas card is another Lili Of The Valley Stamp and I have finally decided to try to enter one of their challenges. This is for the Anything Goes Challenge at Lili Of The Valley Challenge Blog
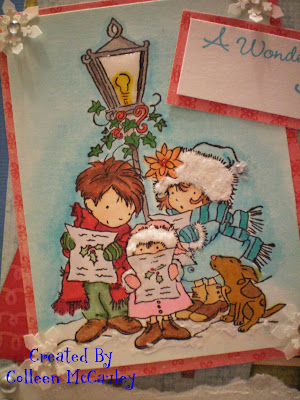
 This image is called Carol Singing and is from last year's Christmas collection. I colored it with copics and used some  Sparkly fluff on the hats and snow. I found the Jolee's corner snowflake stickers in my stash and since I am trying to stop hoarding my supplies, I added them on the image. They look really cute on the card.

I wanted to bring an element from the image onto the card and chose the lamp post. I used my Circut Circle Cartridge, Pop Up Neighborhood, to cut the lamp post. I added some sparkle to it with 3-D Crystal Lacquer and Martha Stewart Glitter. I found the Jolee's wreath sticker with a whole stash of Christmas stickers, and decided it would be the perfect accent for the lamp post.


Once again, I used the Close To My Heart Acrylix stamp from the Art Philosophy bundle for the sentiment on the front of the card. Inside the card, I used a computer generated sentiment and decorated it with a Sandylion sticker. All the papers on the card are from K&Company's Christmas collections that I had in my stash.

I really want to make a couple more of these, but I have challenged myself to use as many of my Christmas stamps as I can this year, so no doubles for me.

I hope everyone had a safe and happy Thanksgiving.
Thanks for stopping by my blog today!

Happy Crafting!
Colleen

Thursday, November 24, 2011

Cricut Blog Weekly Challenge

.

Happy Thanksgiving!

Hi Friends and Fellow Crafters! Happy Thanksgiving to you and yours! On a day when we are all so thankful for the amazing gifts life gives us, our families, friends, the gift of laughter, love and health. I am also thankful for the gift of creativity. I am the only one of my family and friends who crafts, so I am thankful for the crafting community that I discovered through the world of blogs and message boards. It's a world full of inspiration and wonderful people that enjoy sharing ideas and support.
3-=Weekly Challenge #45: Run for the Border Challenge!
The Challenge: Borders can be simple & sweet, elegantly detailed, masculine, or playful . . . and they can be that perfect final touch to add to your project. We want you to make a run for the border . . . your Cricut Borders, that is. Create a projects of your choice and include a Cricut Border cut somewhere on your project. Be sure to include atleast 2 Total Cricut Image Cuts on your project.
Rules and Guidelines: Circle Blog Challenges are open to Cricut Circle Members only. Your project must be newly created for this challenge and include atleast 2 Cricut Image Cuts. You must submit a project to be entered into the Challenge Prize Drawing. One entry per person, please.
How to Enter: Submit your entry using the InLinkz tool found at the bottom of this post. Please post your full name along with your entry. Entries are due by 9:00 pm MST on Thursday, November 24th, 2011.
Prize: We will select one winner to receive $25 in credit added to their Cricut.com account. Please allow 4 to 6 weeks for delivery from winner announcement.
Winner: The winners will be selected randomly from qualifying entries using www.random.org and will be announced on the Cricut Circle Blog on Friday, November 25th, 2011.
This is a short post today. I wanted to enter this week's Circle Challenge and had a great idea for my submission, unfortunately, it was taking a little longer than I hoped, and I knew last night that I would not finish it in time. Back when the Imagine was introduced by PC, I didn't think I wanted or needed it, it turns out I was wrong. It's a great machine that is loads of fun to play with. Here is my submission for challenge


The Details:
Imagine Machine
Carts:
Santa's Village Imagine Cart, Imagine Basic Shapes, Elegant Edges
Joys Of The Season, Christmas Cheer
The Extras
Kraft Paper, Paper from my stash, Rub-on sentiments,
Stickles, Distress Inks
"Inchie"

The card started as my playing with Santa's Village to see what the paper looks like I took a basic shape from the Imagine and printed it green. Then I made the shape slightly smaller and printed the Merry Christmas Paper. I printed out Santa in layers. I love this cut, he reminds me of the old Coke Santa. I used some stickles to outline the cuts. I used the border from Elegant Edges for my border as required in the challenge. The sentiment is a rub-on from Little Yellow Bicycle that has been around in my stash for a couple of years! I thought it looked nice over the border.

Does anyone from the Circut boards who might be stopping by remember the Inchie swapping madness? That is where the two embellies on the card are from. The Santa Hat is made by me. I used  Joys Of The Season for the Santa hat and Christmas Cheer for the inchie square. I really wish I knew3 who made the second scalloped square inchie. It only had a number on the back. I have held on to my inchies and every so often break them out to use on a card or page. So thank you to the Cricut crafter who created this inchie! LOL!

The inside if the card is a cut from Elegant Edges. I printed a computer created sentiment on the smaller cut and then kept my fingers crossed that the cut would be centered on the Imagine. It wasn't the first two times, but I got it right the 3rd time. The flower is from my stash.


Here is a close up of Santa.

I love how this card turned out. I can tell just from playing around with Santa's Village that it is going to be a favorite!

Thanks for stopping by my blog today! Thank you for following me and for all your blogs that I visit for inspiration!

Happy Thanksgiving!
Happy Crafting!
Colleen


Wednesday, November 16, 2011

Tis The Season


Hi Friends and fellow crafters! I hope everyone stopping by the blog over the next few weeks likes Christmas Cards! Something tells me I'll be posting alot  of cards! Maybe I should just change the name of my blog to Col's Christmas Cards Corner! LOL!

The Details:
Cricut E-2 and Gypsy
Cricut Cartdridges- Sophie and unknown
Vagabond
Cuttle Embossing Folders: Swiss Dots and Snowflakes
Nestability Die Cut
Lil Of The Valley Stamp
Close To My Heart: My Acrylix Celebration stamps
Copics
Prismas
Prima Flowers
Stickles
Martha Stewart Silver glitter


I was clearing off the mess table after making my Christmas Tree the other day and found this image stamped and ready to go between a couple of piles of papers. I adore Lili Of The Valley stamps and have many of these sweet characters in my stamp collection. This one is called Angel Gabriel and can be found here along with 99 other wonderful Christmas Stamps. I must have had a plan for this image because it was already cut with a Nestability. I matted the image with a piece of Christmas paper from My Minds Eye, Wonderful Winter Glittered Paper. It had been so long since I used my Nestabilities that it took me a couple of passes through the Vagabond before I realized that I needed to put a cardboard shim under the die cut! I love the shape of that particular die cut, but the largest nestability I have for it was the mat on the image, so I pulled out my Gypsy and opened the Cricut Circle Cartridge, Sophie up. I found almost exactly the same shape was on my cartridge! This became the whole card. I cut a card at 11 and 1/2 inches, then created 2 more mats. I realized that I will never have to use a nestability again! It's almost impossible to tell which is the Nestability and which is the Cricut Sophie cut.
As I was looking at Angel Gabriel, I started to think that it has been ages since I've colored with my Prisma Pencils. I  discovered Copics shortly after buying a set of Prismas, and was blinded by my love of the markers. LOL! I started coloring the little shepherd boy with the Prismas but didn't have a good skin color, so I pulled out a couple of copics. I love the little shepherd, he reminds me of Linus with his blanket wrapped around his head in A Charlie Brown Christmas. When I went to color the sweet little Angel, I couldn't find the colors I had in mind, so I went with BG0000, BG000, BG02 and BG10 to color her. I used Platinum Stickles on her halo and some Diamond stickles on the snow, the stars and the Angel's wings. The image ended up becoming a hybrid of Primas and Copics. I think it turned out cute.

I ran the layers through the Vagabond using my Cuttlebug Swiss Dots and Snowflakes folders to add some texture to the card, and finished it off with some Prima Roses that I had in my stash. I was tempted to break out my Flower Shoppe cartridge for this card, but I really want to use up some of the hundreds of Prima flowers I have. I think they look pretty.

For the inside of the card, I found a couple of white stars on the table, so I glittered them with MS Silver glitter. I layered them in an alternate pattern and popped them up for some height. I stamped the sentiment, and added some Aqua Stickles around the edges of the Cricut cut. I love the stamp set that came along with my Close To My Heart Art Philosophy Cartridge. My wonderful online crafting friend, Belinda, is a CTMH consultant, so if you are still haven't ordered this cartridge, stop at her CTMH blog, here and see what it's all about! Belinda provides great customer service and is also a talented crafter! The stamps are a dream to use, too!


So many cards, so little time! Next year, I will start my Christmas card creating in January!
Thanks for stopping by my blog today!
Happy Crafting!
Colleen

Sunday, November 13, 2011

My Own Personal Challenge


Hi Friends and Fellow Crafters! Did you ever feel like challenging yourself to try something new? Yesterday, I was looking at my mess craft table and decided that I was going to make a card using only what was sitting there. I went with a Christmas card since the card making season is upon us! Here's what I came up with:


Everything on this card are left overs from the Circle Challenge card. I almost tossed the strips out in the garbage, but decided against it. The bird was cut when I accidentally enlarged it on the Gypsy and didn't realize it until I cut it with my Cricut. I added some Jolees crystals that were on my table to the strips.


The  sentiment was going to be the one for the inside of the challenge card, but I tossed it aside and cut the sentiment with my Cricut. I dressed it up with an extra border I had, and a couple of bronze skittles. I also used the skittles on the front of the card. I added the hearts to the other side of the card for fun, and used some Distress Stickles in Rock Candy on it. It's hard to see the Rock Candy, but it has a real nice effect on the hearts.

So that is my quick card. It's pretty cool that this
turned into this

The best part is that the card only took me about 20 minutes to put together once I had the idea. I know I saw something similar in one of my magazines, but for the life of me, can't remember which one! I hope you enjoy my left over card! Thanks for stopping by the blog today!
Happy Crafting!
Colleen

Friday, November 11, 2011

Cricut Monthly Magazine Challenge

 Hi Friends and fellow crafters! Can you believe it's Veteran's Day already? My Dad and my Uncles were all veterans, so I always try to remember the true reason for today. It's not just great sales, it's about great American Soldiers and all they, and their loved ones sacrifice for us. Thank you to all the Vets that have kept my Country, my fellow Americans, other countries and their citizens, and my loved ones all safe from harms way! God Bless you all.


OCTOBER MAGAZINE CHALLENGE!

Who's feeling lucky today? It's 11/11/11!
I hope I am one of the lucky today and win the magazine challenge at Cricut's Circle Magazine Challenge! Anyone who owns a Cricut knows $150.00 credit will go a loooong way towards some great cartridges and crafting happiness!

OCTOBER SKETCH CONTEST!

We are so excited about our new sketch section in the Circle Magazine that we want to get you in on the action! Use this month’s sketch on page 9 and 10 of the October Issue to create your own masterpiece. It can be a card, layout, decor item, or whatever you are inspired to create.
Contest Rules: Use this month’s sketch and at least 3 Cricut cuts to create your project. Contest will open on October 22nd. Please upload a working link or picture of your project to the blog under the Magazine Challenge tab. Please, one entry per person. Entry deadline is Friday, November 11th. The winner of this contest will receive $150.00 credit to Cricut.com!

My details:
Cricut Imagine and Gypsy
Cricut carts: Snow Friends, Christmas, Flower Shoppe,
Celebrate With a Flourish, Ribbons and Rosettes and
Imagine Celebrate The Seasons
Vagabond and Cuttlebug Snowflake Embossing folder
My Mind's Eye Signature Christmas Paper and K&Company Christmas Papers
SEI Red Velvet paper
Tim Holtz Ticket Stamp
Tim Holtz Distress Inks: Iced Spruce, Festive Berries,
Evergreen Bough and Gathered Twigs
Tim Holtz Crackle Paint: Rock Candy
Stickles: Aqua, Gold, Diamond and Orange
Viva Decor Pearl Pen: Anthracite
Glimmer Mist: Spring Rain
Assorted gems from my stash

I am so behind on Christmas Cards. Thank goodness I made a few back in July for the Christmas in July online swarm! LOL! This card will go to a friend of mine who is a true snowman lover! Since the sketch we are following were two cards that are in the online Circle magazine, I'll tell you what I thought were the components for it.  The three components from it for my card are the wreath, which on the sketch is a circle component. The Heart, which is a heart on the sketch, and the snowman which is am image of your choice for the sketch, I also think the border was a component, but I'm not 100% sure, so I used one anyway.  Better safe than sorry!

I love the snowmen on Snow Friends, so I decided to use one on my card. I was lucky in July online swarm, and won a great My Minds Eye paper stack courtesy of Sara on the Cricut Circle boards. I loved the snowflake paper in it and wanted  to use that as my background on some kraft paper. I broke my spending ban, (although not the paper ban part of it) and ordered the new Tim Holtz Autumn and Winter limited edition Distress Inks, so I figured I had better use them. I inked the flower from Flower Shoppe, and a Tim Holtz Ticket stamp. The colors are amazing. If you are a distress ink fan like myself, my advice is to grab 'em while they are out!


I have to say that I am a major paper flower maniac, and the I can't get enough of these flowers. My Prima flowers have been collecting dust since I was given this cartridge!
The border was cut from Ribbons and Rosettes, it's a pretty Christmas Tree. I can't wait to try the Rosette that matches this cut! I tied some twine around the border for fun.

The heart was made by following a technique from Tammy Tutterow's Blog which was a debossing technique using Crackle Paint in Rock Candy. I am obsessed with this technique and have so many ideas running through my head for it. I used a studio G stamp to lightly stamp "I Believe" on the heart, but I am thinking about going back and making it darker, I still haven't decided.  The Rock Candy Crackle paint doesn't translate well on the pictures, but it looks really cool.


I used a wreath from Christmas as the Circle component. I found some green and red gems on my desk and used them as berries. I like this wreath and have to remember that it's in my Gypsy so that I'll use it again.

The inside of the card is a shape from my Imagine Machine and a color pattern from Celebrate The Seasons. I cut Let It Snow from Celebrate With A Flourish and used that as my sentiment.


I really enjoyed this challenge, and I hope my girlfriend enjoys this card! So all that's left for me to do is to link it up and hopefully this will be my lucky day! Thanks for stopping by my blog today!
Happy Veteran's Day!
Happy Crafting!
Colleen


Wednesday, November 2, 2011

Some Halloween Fun

Hi Friends and fellow Crafters!
I know these are a few days late, but I wanted to share a couple of Halloween projects that I made. Back a few posts, I entered a couple of cupcake treat boxes in the cuttlebug challenge on the Cricut Circle blog. I loved them so much that I made these fun treat boxes for my son's class at school for Halloween. If you have a Cricut and do not own  Sweet Tooth Boxes I highly recommend this cartridge. I am always sending something into school or to my Mom's friends, so this really comes in handy for packaging them in fun ways.
I like that you don't have to only put cupcakes in them, either.


 One of my son's classmates cannot eat solid foods, but I know he can have Yogurt. I was able to make him a treat box and put a Yoplait in it for a near perfect fit. Sorry for the sloppy picture, I didn't realize the holder was not flat. I fixed it right before I left to deliver them to the class. Isn't the bat fun? He was easy to put together. I used the bat from Hello Kitty Greetings, hid the contours and resized the wings. After the wings were cut, I did the same thing again only this time I resized his nose and eyes. For his fangs, I just hand cut a couple of triangles. I made the bow with the cuts from the Ghosts. Here is the original post for anyone interested. I am already working on the Thanksgiving design for the next batch of cupcakes. LOL!
I also wanted to make a little something for my neighbor's 8 year old son and this is what I came up with.

It was hard to get a good picture of the container. I used an empty Utz Pretzel Rod container and added some cuts from Mini Monsters and Bump In The Night. I filled it with some candy, hot wheels, popcorn and a card.
The card is my favorite. I saw a card with the sentiment Greetings From Your Closet on page 64 of September's Cardmaker magazine. I thought the Greeting was adorable and it was perfect for the Bump In The Night cartridge monsters.
I used a door from the Wildcard Cartridge and added some glitter to the panels. Since it was a Halloween card, I wanted to grunge it up a little, so I used Gold Crackle Paint and brushed it over the glitter and door. I cut a sign from Freshly Picked, then made some cuts into it and ran it through the vagabond. I distressed it and used distress ink to age it. The word Greetings is cut from Winter Woodland. I cut all the monsters from Bump In The Night. I really love that cartridge.

The inside of the card is also Bump In The Night. The sentiment actually says "In your closet" but I altered it by cutting the word "In" off and adding "From" to the phrase. I found the word on the Sentimentals cartridge. I added a bat sticker that I had in my stash to cover the hole left by the word "In". I didn't sign the card from us, but did address the card to our neighbor's son. I added a "wall" to the back of the card, just to make it look like the door is in a room. I also used distress ink on that, too.


My neighbor knew immediately where the bucket came from, as did her son.  I think the handmade card gave me away!
I hope everyone that celebrates Halloween had a fun day!
Now it's time to take down the decorations and get ready for Thanksgiving, It's so hard to believe how fast this year has gone.....
Happy Crafting!
Colleen

Friday, October 21, 2011

Cricut Monthly Challenge Home Decor


Hi Friends and Fellow Crafters! Wow, Halloween is only 10 days away, I have got to get busy! I still have to finish the cupcake holders and assorted treat ideas I have for my son's class. Believing I was going to have so much done by now, ha! I made extra banner cuts when I entered the Cricut Banner contest, so I was hoping to actually make myself a banner for Halloween this year. Something tells me that may not happen. At least I have the outside of my house decorated...
Last month in the Cricut Circle Magazine, magazine DT member Janet Wilkins created a fabulous Spooky tree and I knew I had to try my hand at it. This is my version of her tree. Janet used a black tree branch and a 4 inch block, Unfortunately it has been so wet around here that I needed to buy a branch at AC Moore. It lights up and I got it for $5.00. Don't you just love 50% off coupons! LOL! At 17 inches, it was the smallest of 3 sizes. I may go back and try a bigger version of the tree for the holidays if I have the time. Here is the info from the Circle Blog for the challenge.


The Challenge: Create a Halloween Home Decor project! Your project must include at least 2 different Cricut Image Cuts.
Rules and Guidelines: Circle Blog Challenges are open to Cricut Circle Members only. You can create any type of project you would like (tag, altered project, mini album, etc.) but your project must be newly created for this challenge and include atleast 2 Cricut Image Cuts. You must submit a project to be entered into the Challenge Prize Drawing.
How to Enter: Submit your entry using the InLinkz tool found at the bottom of this post. Please post your full name along with your entry. Entries are due by 9:00 pm MST on Sunday,October 30th, 2011.
Prize: This month the winner will receive $150.00 in credit to Cricut.com.
Winner: The winner will be selected randomly from qualifying entries using www.random.org and will be announced on the Cricut Circle Blog on Tuesday, November 1st, 2011.

So with all the new carts just released, I REALLY need to win this challenge! LOL!
Here's how I created my version.

Materials
Cricut Gypsy
Cricut E-2
Carts used: Chic and Scary, October 31st and Happy Hauntings
Martha Stewart Glitter: Glow In The Dark, Coarse Glitter, Peridot and Onyx
Stickles: Black Diamond and Purple
I-Rock and Jolees Hot Fix Crystals
Ribbon and Twine
3-D Crystal Lacquer, Ranger Glossy Accents
Styrofoam and a cardboard box from my stash
Papers and Chipboard

I designed all the tree charms using my Gypsy and the cartridges listed. I cut them using the E-2 on multi-cut 2 times. The chipboard I used was a backing I had saved from a paper stack that I actually finished! The tree charms were all cut between 1 and 1/2 inches to 2 inches.


I hid the contours on my Gypsy so that the chipboard was basically a shadow of the ornaments. Then I went back, copied the cuts to a new page on the Gypsy, and cut them with my chosen papers. I also flipped all the images and cut them, as well. I added lots of glitter, stickles and some bling for embellishments. Once they were all dry, I punched holes in them and used some natural twine I've had for ages for ties.

Here are a couple of favs.


I  love the October 31st cut from Chic and Scary. I used some Theresa Collins Halloween paper for this ornament. I added some Black Diamond Stickles and orange ribbon for some extra decoration. In the picture above the close up, you can see that I used the negative cuts for the other side of the ornament. I love the coarse glitter on the Witch. Every spooky tree needs a sparkly black cat! That is the MS Onyx glitter on it. The purple witch ornament has a funny story attached to it. It's not in any of the pictures of the tree because it went missing right before I took the photos and turned up right before the tree was leaving the house to go to it's new home. It seems a little kitten thought the twine was for him to play with, so he took it, must have batted it around then lost it under the TV stand. I tried to get a picture real fast of it before my DH took it for delivery, and got picture proof that I should sweep more and spend less time crafting or on the internet! LOL! Yes that is a kitty hair on it in the picture, yes it was properly cleaned off before DH left the house, and no I did not sweep under the TV stand even after finding the ornament! I wanted to do a close up of my favorite Halloween cut this year, the Headless Horseman from Happy Hauntings, but unfortunately, it came out blurry. Here he is on the tree.

I used MS Glow In the Dark Glitter on the tree. I used MS decoupage Glue and  sealer to adhere the glitter.


I found a box that I had saved for future use that was perfect for this. And opened it flat.


I covered it with paper and ribbon, then hot glued Styrofoam inside it for the tree.


I added all the ornaments to the tree and tied an orange ribbon around the bottom. This is it lit. It's pretty, isn't it?


I decided to make this tree for one of my dearest friends, my son's Godmother. She was here visiting us last week when she showed me a picture on her phone of a Halloween tree from Walmart that she had wanted since last year, but couldn't find anymore. My DH was a sweetie and took it to deliver to her today. This was a fun project to create and give as a gift. If you have some extra crafting time, why not give this one a try?
Thanks for stopping by my blog today!
Happy Crafting!
Colleen