Thursday, March 31, 2011

Cricut Circle Weekly Blog Challenge

Weekly Challenge #26: Just Because Challenge!


The Challenge: Create a layout featuring an everyday topic or create a “Just Because” card.


Rules and Guidelines: Circle Blog Challenges are open to Cricut Circle Members only. You can create any type of project you would like (layout, card, tag, altered project, mini album, etc.) but your project must be newly created for this challenge and include at least 2 Cricut Image Cuts. You must submit a project to be entered into the Challenge Prize Drawing.

Here is my entry into this week's blog challenge. It is a thinking of you card that I created for one of my dearest friend's Mother In Law. She wasn't feeling well recently, so I just thought I would send her a little something to let her know how special she is. This challenge provided me with the perfect opportunity to make the card and get it in the mail fast!

Materials
Cricut Expression and Gypsy
Cricut Carts:
Ornamental Iron
Paper Lace
Picturesque
Belles 'n Whistles Stamp
Copics
Diamond Glaze
Martha Stewart Glitter
Stickles
Jolee's Crystals
I-Rock


I have been trying to learn new techniques in my card making, so I went with a different type of card than I usually create. I decided to attempt a tri-fold card. I have wanted to use my Paper Lace and Ornamental Iron carts on a card for a while and I thought they would be perfect for this project.
I used Ornamental Iron to create the doors on the card. It is the window cut  from the gate #10. I copied and flipped it so that the sides would balance. I used it on the front and inside of the card. For the base, I cut 4 pieces of heavy white cardstock into rectangles just slightly larger than the window cuts, ran them through the xyron machine and glittered them with Martha Stewart Fire Opal glitter. To add some interest inside the card, I used a base from Paper Lace as a mat for the my image. The image is called Sunshine and Apples by Belles 'n Whistles Stamps, Elisabeth Bell is the artist. I made corners from Picturesque and used my I-Rock to add Jolee's crystals on the tops of the corners. I cut Thinking of You from Paper Lace and adhered it to the front of the card. I used stickles to add some sparkle and a couple more Jolee's Crystals to the spot where the letter "I" needs a dot. I used K & Company Que Sera Sera paper for the pattern paper, a beautiful metallic golden cardstock from Paper Temptress, and a piece of golden brown cardstock from Bazzill for the shadow of my sentiment and for the corners.
I colored Sunshine and Apples with Copics. I used so many colors on it that I gave up trying to write them down for this post! I used Diamond Glaze on the apples in her basket and stickles on some of the flowers to sparkle them up a little. It's kind f hard to see them in the pictures.

My thoughts for this card was to do something sort of monochromatic. I didn't come as close as I had hoped, but I think the card came out pretty good.

So it's already in an envelope and ready to be mailed, that is a record for me! Thanks for stopping by the blog today!
Happy Crafting!
Colleen

Tuesday, March 29, 2011

A Couple of Berry Fun Challenges


Hi friends and fellow crafters! Here is another birthday card for one of my Mom's friends. My Mom sees me as her own private Hallmark! When it comes to cards, I think my Mom's friends have more of my cards than anyone I know.
Since I had to make a card, I decided to make one to enter into a couple of challenges. I am entering this card in
1. CPS challenge 211. The prize this week is a Kraftin Kimmie stamp. That was all I needed to hear to be there! LOL!
2.  Kraftin Kimmie's Krafty Girl Challenge Blog. This challenge is to use Spring Colors. So I used a bright green cardstock from Core-dinations. for my base. I chose K&Company Berry Sweet papers for the background paper and some prima flowers for an accent.

This is Stella Strawberry. She's a happy little dancer!  I ordered her and a few of her friends back in January from Kraftin' Kimmie. She is designed by Annie Rodrigue as part of the Moonlight Whispers line, one of my favorites.
I used copics to color her, trimmed her, and then layered her on a nestability. I used some stickles to glitter the strawberries, it's hard to see in the pics, but they look great. So Sparkly!
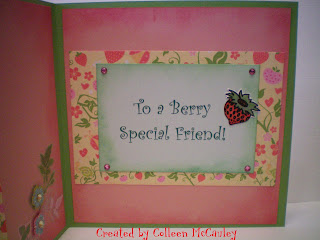
I am still trying to focus on making the inside of my cards prettier. Here are a couple of pictures.

I printed out the sentiment in green on some light green cardstock. The cute flowers are a sticker that I've had hanging around on my craft table for at least a year! Seriously, that's how long they were there! I would move them around and keep saying that I was waiting for something special to use them on! I am such a hoarder, lol! I used some pink cardstock, plus the extra paper from the 12 x 12 sheet I used on the front. I am making an effort to use as much of the 12 x 12 paper I choose for cards to finish them and not bounce around for hours looking for extra papers to match! ok, maybe it's not hours, but sometimes it seems that way!
 I stamped an extra strawberry for the inside of the card to add some interest. The strawberries came with my Stella Strawberry stamp, as did a sentiment. I colored them with copics, then I used diamond glaze to shine them up.  I think the strawberry looks sweet on the prima flowers.

Here's one more look at the completed card, she's berry cute, isn't she?
Thanks for stopping by my blog today!
Happy Crafting!
Colleen

Monday, March 28, 2011

And the winners are!

Hi Everyone!
Here are the winners of the blog candy for the weekend's hop.

Serenade 
#15


Perfectly Unperfect Cards said...


That is beautiful, Way to get me inspired :D Thanks so much for sharing. Everytime I hope I am amazed at what some paper and paint can turn into :D

Thank you for you wonderful comment!
I will email you shortly!


$10.00 Gift Card
#9

Queen Bee said...


such a pretty card and such a lucky friend!

 
Thanks for your sweet comment! I will be contacting you to see which Gift Card you would prefer!
 
Thank you to everyone for all your wonderful comments! I am so touched and honored by your kind words!
I look forward to seeing everyone again at KarelJ's next hop
 
Happy Crafting!
Colleen

Sunday, March 27, 2011

KarelJ's Make Up Your Own Holiday Day 2

Welcome to Day 2 of KarelJ's Make Up Your Own Holiday Blog Hop!
We are following the same hopping path as yesterday!

I would just like to take a moment to thank KarelJ for all the hard work she puts into her blog hops. Coordinating 29 crafters is not an easy job, but Karel is amazing and makes it seem effortless!
 Thank You KarelJ! We appreciate all you do for these blog hops!
You should have arrived here from Denine at Pumpkin and Spice . Yesterday she showed us the cutest project to celebrate her made up holiday for taking out the family for dinner when somebody gets a new job. I love that idea! Isn't she creative? If you would like the information on Karel's fabulous blog candy, or see the entire line up again, please go to my post for yesterday. Our blog hop started with Karel so if you just popped in my blog first, why not start at the beginning? You'll be happy you did!

Today, I have a sweet card to share with you that I made for one of my dearest friend's birthday. We have been friends since we were 11 years old,  and since I only have one brother, it has been such an honor for me to call her my "sister".

I wasn't planning on a second day project, but since I created this while I was in the middle of the topiary, I figured I'd share it with you today. It's a simple card that I created using the new Whiff Of Joy Spring stamps by Elizabeth Bell. The grass that she is standing on is also from Whiff Of Joy. I had that sitting around forever because I was too afraid to try masking the image. It turns out it was so easy that I laughed when actually did it! Here's a link for a tutorial if you have never tried it out. The Birthday Wishes stamp is from Kraftin' Kimmie. I colored the stamp with my copics and used stickles to highlight the flowers and her dress. I used colors in the YR family for her dress. With all the excitement of the other project I was working on, I must have thrown out the paper I was using to jot the colors down, so I can't say exactly which colors I used.  Distress Ink (Tumbled Glass) added some blue to the background. I did this by covering the image with the mask I made of it, and blending some color around it. This was my first time coloring grass, so I need to work on the technique a bit, but since I'm not afraid of masking images anymore, I hope to try coloring it again real soon!


Since this is part of my Paper Flower Appreciation Holiday, I figured a close up of the flower was needed! I used three Prima Flowers. (Please don't tell my Cricut machine!) I folded over two green flowers and adhered a Prima rose on top. I used stickles to glitter it a little bit and stuck a pin in it.

It's a clean and simple card. I used Basic Grey paper ( Lemonade) for the background, and Core'dinations for the base. I found a beautiful Birthday Poem online, sorry I don't remember the site, and printed it out from my computer using a nice font. Finally, I added some bling to finish the card.

So let's sweeten the blog candy a little more today. If you leave me a comment, I will use Random.org to pick another name for a $10.00 gift card to Michael's, AC Moore, Or Joann's. You tell me which you would prefer.

Your next stop on the Blog Hop Trail is Mistyrose. I don't know if she is planning another project, but if you missed her Art Journal yesterday, stop by and take a look. It's wonderful! Finally, thank you for spending extra time at my blog this weekend. I have enjoyed this hop very much and hope you have, too!
Happy Crafting!
Colleen

Saturday, March 26, 2011

Paper Flower Appreciation Day!


Hi to all the folks coming by for KarelJ's Make Up Your Own Holiday Blog Hop!
This is one fun hop to be in! If You are coming from Denine at Pumpkin and Spice  you are hopping along the right path. Isn't her blog fabulous? And...You can shop there, too! I love blogs where I can shop! My Hubby? Not so much! But back to the blog hop...
 If you have stopped by here just to see what I am up to, why not head back to KarelJ's blog to start, so you won't miss anything on this wonderful, creative journey!
Here is the entire line up of crafters participating in this weekend's blog hop. I know there a quite a few of us, but there are two days for you enjoy, so hop at your leisure!

1. Karelj at One By One The Flamingos Are Stealing My Sanity at http://www.kareljcreations.com/
2. Janice at Cricut Confessions at http://www.cricutconfessions.com/
3. Summer and Jennifer at The Cricut Diaries at http://www.cricutdiaries.co/
4. Denine at Pumpkin and Spice at http://pumpkinspiceblog.blogspot.com/
5. Colleen at Col’s Creative Corner at http://www.scrappycol.blogspot.com/ You are here!
6. Mistyrose at Sweet Magnolia Rose at http://sweetmagnoliarose.blogspot.com/
7. Ellen at Card Monkey at www.cardmonkey-business.blogspot.com
8. Rachel at Suburban Crafter http://www.rachelstampshappy.blogspot.com/
9. Monica at Scraps 2 Treasure at http://scraps2treasure.blogspot.com/
10. Jen at Young’s Scrapping at www.youngsscrapping.blogspot.com
11. Becka at Creations With Becka at www.creationswithbecka.blogspot.com
12. Jamie at Glitter, Paper, Stamps, Oh My! at http://www.jamieisacraftymomma.blogspot.com/
13. Michelle at Peanut Butter and jelly Designs at http://peanutbutterandjellydesigns.blogspot.com
14. Celeste at Touched By A Butterfly at http://touchedbyabutterfly.blogspot.com/
15. Leah at Leah’s Card Designs at http://leahscarddesigns.blogspot.com
16. Calie at Calie’s Creative Corner at www.Caliescreativecorner.blogspot.com
17. Audrey at It’s A Beautiful Life at www.audreyscardsbydesign.blogspot.com
18. Bonnie at A Scrap Above at http://ascrapabove.blogspot.com
19. Diane at Crafting This Moment at http://www.craftingthismoment.blogspot.com
20. Nicolette at Beyond Scrapping at www.beyondscrapin.blogspot.com
21. Gina at Gina Thornton Stamping at http://ginathorntonstamping.blogspot.com
22. Kathryn at Creations With Kathryn at http://www.creationswithkathryn.com/
23. Yolie at Just Yolie, Just Create at http://justyolie.com
24. Patti at Short ‘N Scrappy at http://www.shortnscrappy.com/
25. Krista Orr at Scrapaleupagus at http://www.scrapaleupagus.blogspot.com/
26. Kay Craig at 100 Things at http://kopperhead100.blogspot.com

Karelj is offering an over-all blog candy for those who are hopping along with us. She thought it would be fun to have some holiday-themed candy for this hop--but, of course, made-up holiday items were hard to come by! She decided to do a whole bunch of *regular* holiday themed stamps for you to enjoy. From Fiskars, there is an assorted holiday set; there's an alphabet from All Night Media, a set of 100 plus clear stamps and a storage case from Family Memories, and 5 sets of clear stamps from various dollar bins in big box stores. How to win them? Follow along the blog trail, leaving a comment on each and every blog. On Monday, Karelj will ask her buddy Randy (random.org) to select a blog number (from the list), a day (Saturday is one, Sunday is two), and a comment number from that blog. Please make sure you have left a reliable way to contact you (email is best, in the safe format of **** at **** dot com ) so you can be notified by her personally. If you don't, she’ll have to select another winner.”
I am also giving away some fun blog candy. See the end of my post for details. Did you notice the flowers in the picture at the top of my blog? They are for my:
                                                      
                                                           Paper Flower Topiary

I love paper flowers! My hubby knows how much I love them, so instead of real roses for Valentine's Day, he gets me Primas! I decided that my love for my paper flowers should have it's own holiday, hence Paper Flower Appreciation Day. Paper flowers are so great that they can have any day you choose for this holiday! I'll go with today, even though in making this topiary, it's been more like paper flower appreciation week and a half! LOL!  So while there may be shorter easier ways to create these lovely decor items, here's
what I did!
Materials:
Cricut Expression
Gypsy
Cricut Cartridges-
Forever Young (Flower)
HomeDecor (Butterfly)
Mother's Day Bouquet (Flower)
Picturesque (Flower)
Walk In My Garden (Ladybug)
Easter 2010 (Easter Bunny)
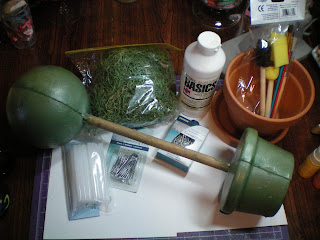
Topiary Form
Clay Pot
White Gesso
Mint Green Acrylic Paint
Ranger Claudine Hellmuth  Studio Mixed Medium Gloss
Ranger Alcohol Inks
Ranger Distress Inks
Viva Decor Pearl Pens
Martha Stewart Glitter
Doodlebug Flock
Dew Drops Memento Dandelion
Dew Drops Versafine Chalk Turquoise
Ranger Stickles
Diamond Glaze
Ribbon
Moss
Prima Mini Roses
Floral Picks
Corsage Pins and Floral Pins
Hot Glue Gun


When I first decided to make a topiary, I went to AC Moore and spent about 10 minutes looking at the Styrofoam balls and searching for dowels. After giving up on finding the dowels, I went to a salesperson to ask about where I could find dowels when I looked  over her shoulder and spotted a pre-made topiary shape. I checked the price to find it was only $7.49 and naturally I had my 40% off coupon, so I was sold. I found a clay pot and base that it fit nice and snug into and came home to begin my project.


To start my project, I primed the clay pot and base with 2 coats of White Gesso, letting it dry between coats. I also painted the dowel on the form with white gesso. Once the gesso was completely dried, I used an acrylic paint that I had by Dona's in Mint Green to apply 2 coats to the clay pot. Here is how it looked.

Then I let the pot dry overnight. The next day I used Ranger Claudine Hellmuth Studio  Multi Medium Gloss to seal the paint. The finished pot looks like this.
I love this product line from Ranger for altering art and collage. It also comes in Matte. The range of use these products have are amazing. If you ever get the chance, and haven't done so already, check out Claudine Hellmuth. . If you enjoy mixed media, you'll love her work.
Once my pot and form were ready to go, I grabbed my Gypsy and started picking out my favorite flower cuts. My first cut was with Picturesque but I made the flowers too small. Naturally, I didn't realize this until I had put 10 flowers together and tried them out on the form. I would be looking at close to 100 flowers at the size I had originally cut them at which was about 1 inch ( I know! What was I thinking!) for the largest layer on the flower. Once I had that figured out, LOL, I checked my receipt that said the form was 5 inches, so I went with almost two inches (1.92 x 1.82) for the largest flower from Picturesque, and made 5 layers to the flower. I used the flower that was 6th in on the 3rd row on the overlay, for my first flower. It looks like a  Chrysanthemum to me. I made 10 of them. I used K&Company Que Sera Sera Specialty Paper. Then I cut 10 of the flower next to the Picturesque Chrysanthemum, I went with 6 layers of this flower starting at 1.86 x 1.59 for the largest and .89 x .76 for the smallest. I ended up only using 5 of the layers. I used Blue and Purple paper from SEI for these.
My next flower was from Forever Young, another  of my favorite carts for flowers, and I used the 7th flower in on the last row of the overlay, I think it may be a daisy. Anyway, I cut 10 of them in 4 layers  and the shadow, starting at 1.53 x 1.47. This is also the size I cut the shadow for. I used the Que Sera Sera paper for the flowers.
For the last flower, I used my Mother's Day Bouquet Cartridge. I chose the 3rd flower in the 1st row for the Topiary. I cut the largest layer at 1.72 x 1.59 with the shadow the match this layer. Then I cut 3 more layers, plus the shadow for 5 layers. The smallest layer was 1.07 x .98.  I used K&Company WB Gypsy Baby Paper Pad. I chose the pink and blue for the flowers. I also cut 10 more flowers starting at 1.63 x 1.51 for the largest layer and shadow, down to .85 x .78 for the smallest. I used K&Company Que Sera Sera Specialty Paper on these.
 Ok, so here is where I will admit there was no real rhyme or reason for my flower sizes. I just knew I was going to go bigger than the 1 inch!
Here are a few pictures of the flowers in progress:


Here are a bunch of flowers almost done
 
Forever Young Flowers on Mat

Stacks of Flowers before Dew Drops


Inked Flowers with Dew Drops and Distress Inks (Worn Lipstick)


Here are some other pictures of the Mother's Day Bouquet Flowers in progress. I have to say that I think these are my new favorite flower to use. They were inked with Distress Ink, Worn Lipstick as well.

You can see how I manipulated the paper to shape the flowers. I won't bore my fellow crafters with the details. A search of Youtube will bring up a gazillion videos on making paper flowers. I spritz my flowers with Shimmerz Spritz in Baby's Breath, to shape them. These are the flowers from Mother's Day Bouquet.
The next thing I did was poke a hole in the center of my flowers with a Paper Piercer. Here a few flowers lined up and ready to get pierced!

I colored my corsage pins with Ranger Alcohol Inks. My method of coloring skittles with Alcohol Ink is to place them a small baggie, add a couple of drops, and done! I started out using this method, as you can see by the picture below, then quickly changed to sticking the pins in a sponge and touching the tip of the bottles to them. It was much more efficient! I had a picture of all 65 picks dyed, but somehow it was deleted either form my camera or card. It looked so cool!

And began the task of placing them in the form.
I've never done anything like this before, so it at first I was just trying to set them in rows. I also had them placed too close and they bunched up. I decided to just start placing them as random as possible and here is what it looked like. You can also see the corsage pins in all their alcohol inked glory!


I ran ribbon around the pole and used a flower to pin it in on the top. I filled the flower pot with moss, held in by floral pins.
So after I put all the flowers in, it occurred to me that maybe I should have painted the topiary top white. That led me to needing to fill in the blank spots. I decided to use butterflies, so I went straight to Home Decor for my favorite butterfly. I cut two sizes, 3.31 x 2.16 and 3.67 x 2.39 and copied them. Then I flipped the copies. I used a couple of pieces of Basic Grey (Eva, I think) paper and some K& Company to cut the butterflies. I used Viva Decor Gel in Cream to accent the butterflies. I also cut some ladybugs from Walk In My Garden glued them to corsage pins and filled in some spaces. I used Ranger Black Diamond Stickles to glitter the head and spots. I used Diamond Glaze to make the back shine. For the space that was still showing, I used stickles to glitter it up! I can be resourceful when necessary!
As I was working on the flower pot, I decided that it looked a little empty to me. I cut a couple of Easter Bunnies from Easter 2010 and ran them through the Xyron machine. I then ran them through a second time and added Doodlebug White Flock to them. I glittered their bows with MS Glitter and glued them together. I used a pin glued between them to stick them in the moss. I figured I can pull the bunnies out after Easter and still enjoy the topiary. I also placed some Prima Mini Roses in the moss for added color.
Here are a couple of more pictures for you

Back of Topiary
I enjoy trying new crafts, so this was fun for me. Now that I have made one, I have lots of ideas for more. I know this was a very long post, and I thank you for looking at my project. I hope you might be inspired to try one. It was very inexpensive to make, under $10.00, and easy too!
So now that you have seen my project, here is my blog candy
I am giving away a Serenade Cartridge so you can make your own paper flowers!
If you leave a comment for me and a way to reach you, I will use Karel's pal Randy (Random.org) to pick a number for the cartridge. Don't forget to leave me a way to reach you! The winner will be chosen on Monday. The winner does not have to follow my blog, but I would love it if you did!
Thanks for hopping the blog trail with me! From here, your next stop is Mistyrose, I know you will enjoy her Made Up Holiday! She is very talented!
So whatever made up holiday you may celebrate, take some time to stop and, well, you can't smell paper flowers, but you can still enjoy them! Happy Paper Flower Appreciation Day!
Happy Crafting!
Colleen

Thursday, March 17, 2011

I Scream...

You Scream, We All Scream For Ice Cream!


Happy St. Patrick's Day to all my friends and fellow crafters! Thanks for coming by my blog! Who loves ice cream? I do! I do! I can still hear and ice cream truck's music when they are two blocks away! LOL!
I also loved all the treats on the Cricut Cartridge Sweet Treats, so I had to have it when it was released. Then, it sat, uploaded to my Gypsy, but buried amongst all my other must have carts! Until, one day, I came across a digi stamp site Kenny K I love these images! They are fresh and youthful without being too "cutesy". All of my Nephews and Nieces have grown into wonderful young adults, so the cute cards don't excite them too much. This card is for my Niece, Jessie. She is currently in college far from NJ and I wanted her to know that I was thinking of her. My fondest memories are of her and her passion for "lallow". She would save anything yellow that crossed her path! She was just the sweetest little girl, and now she is growing into a beautiful, smart, charming, young woman. The best part is that she still loves lallow! When I saw this digi, I immediately thought of Jessie, so I had to purchase it and color her yellow! I finally used my Sweet Treats Cart, too!
                                                             Here is the card info:

Materials:
Cricut Carts - Sweet Treats (ice cream cone)
Every Day Cricut (Eyelet Circle)
Copics
Core'dinations Brown Cardstock
Basic Grey Lime Rickey paper
MS Doily Lace Trim Deep Edge Punch
Diamond Glaze, MS Glitter
Distress Ink (Spiced Marmalade)
Buttons, Ribbon, Twine


The base of the card is 11 inches, scored at 5.5 inches. I cut the ice cream cone at 1.30w x 2.40h and the layers to match, using the solid papers from Lime Rickey.Then I added some shadows with Copics on the ice cream layers. I used a little scrap of SEI pink velvet paper that I had sitting on the table to cut sprinkles for the ice cream cone. I pieced the cone together, and used a coat of Diamond Glaze sprinkled with MS glitter to give it a wet look. I added cris-crosses to the cone with a Copic Atyou Spica Pen in Sand. I was pleased with the cone when it was finished.

I did a search on the internet for ice cream related quotes,and found the quote I used from Charles M. Schulz. I am sure it's tough being so far from your family and handling school obligations, so I wanted to let her know that we are so proud of her and support her here at home. I printed the quote on cardstock and cut it with a scalloped nestability. The larger, scalloped, eyelet circle is cut from the new Cricut Circle Cartridge, Everyday Cricut. I wasn't sold on the cartridge at first, I didn't really need a cart with a Circut Cake Logo on it, but that logo base worked out well as a base for my quote! LOL!
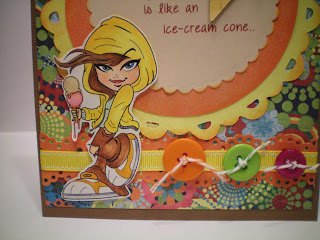
The fun part of the card was coloring the image. She is a dream! There are nice areas to highlight, great shadowing opportunities. and her eyes are just perfect! I think she is some of the best coloring I have done, especially on a digi stamp. I used the colors for her skin based on a video by Elaine Hughes at Quixotic Papers in the UK. Here's the link to her tutorials. One of her posts, here has some of the best Copic hair coloring I have ever seen. Her blog has become a favorite of mine.
I used E11, E00, E000, E0000 and R20 for the skin tones. For her hair, I used E34, E57 and E47. Her pants were done with E39, E27, E29. Her shirt is done with G20 and G21. Her eyes were done B16 with a touch of BG01. Her jacket was done with lots of lallows. Y02, Y06, Y11, Y15 and Y17. I forgot to note her sneaker colors, but I am pretty sure I used Y17 with a touch of a YR color. I used C2 and C4 on her sneakers and zipper on her jacket. I used YR00, RV21 and FRV1 for the ice cream and YR12 for the cone.
I used the MS Doily Lace Trim Deep Edge Punch to make a border and adhered a yellow ribbon across it. I popped her up on the corner and added some buttons to finish the card. Here is a close up of the stamp.


Thanks for popping in to see my card. I hope you enjoy the day!
Happy Crafting!
Colleen

Monday, March 14, 2011

Quick Card For My Father In Law

Materials used
Circut Gypsy and Expression
Gypsy Wanderings and Just Because Cartridges
Metallic Cardstock in Blue and Brown
Basic Grey Paper - Offbeat
Black Skittles
Pop Dots
Spellbinders Nestabilities Labels 6
Distress Inks

Hi Friends and fellow crafters! I don't know how the holidays are in your homes, but every year, a present in our home goes missing. It's a long standing tradition in my family to put a present where it will be "safe", then forget where you put it and finally unearth it some time after January. This year was no exception. My Mom, who is 79 and entering her forgetful years, wanted to give my Father In Law a present. He is a man who loves his Starbucks coffee, so I figured that would be the perfect gift for him. I took her shopping and she picked him up a Gift Card. I tried to pry it out of her hands, but she wouldn't budge. She is fiercely independent and she insisted she would remember where it was. I made a mental note of where it was in he purse so that when it came time for gift wrapping I would be able to find it. Christmas Eve comes, and I ask my Mom for the card so I can put in a wrapper I made for her. She looks in her purse, but alas! No Starbucks Card! The annual hunt for the gift game was afoot! The missing present had revealed itself! I looked in purses, I looked under the bed, between the mattress, inside jewelry boxes, in draws, but the card was nowhere to be found! Under her dresser? No card! Pull out the draws, look inside. No card! Inside other Cards? Nope! I even looked inside shoes! The Starbucks card had vanished into the missing present void! My Mom comes in her room with my package, and insists the card decorating it is her card. I attempt to explain that it's a different card, but then decide to let it ride, and let her have the card. I knew that Starbucks card would eventually reveal it's whereabouts to me. Later, we told my dear Father In Law there was another Starbucks card, and that it would eventually find it's way into daylight! Fast forward to a couple of weeks ago. I am cleaning my Mom's room, and what do I find on the floor of her closet? You guessed it! A Starbucks card! I decided to make a quick card for my Father In Law, and this is it. It is pretty simple compared to most cards I have been making lately, but he really enjoyed it! So that is the story of the missing Christmas gift for 2010!
The card is a basic 4 1/4 easel card. If you don't know how to make an easel card, Splitcoast Stampers has a great tutorial here.  I used blue metallic cardstock from Paper Temptress for the easel. Brown Metallic cardstock for the base on the sentiment, the cup and the steam. The cup is from Gypsy Wanderings, I used the Basic Grey paper to cut the cup and steam. Love You a Latte comes from Just Because cards. I popped the cup on the easel and slid the card under it.

Don't forget KarelJ is hosting a fun blog hop on March 26th! If you click on the badge you will find the information. We have lots of great projects and blog candy lined up for the hop! Save the date!
Happy Crafting!
Colleen