Thursday, November 21, 2013

25th Anniversary Card

Hi friends and fellow crafters! I can't believe I am entering into the stage of my life where my best friends and I are hitting milestones like a 25th Anniversary. I made this card for my BF. She and her husband have been married for 25 years and have 2 beautiful grown children.


I cut an extra layer for the flutes using PaperTrey Ink's Clear Cardstock. I used Diamond Stickles sandwiched between the clear cut and a layer cut from DCWV's Shimmer Stack to create the appearance of champagne in the glasses. 


I used pink cardstock from DCWV ShimmerStack for the mat. I used an Anna Griffin Embossing Folder and ran it through the Cuttlebug. It embossed beautifully. I cut Happy Anniversary using my Cricut Expression 2 and Martha Stewart's All Occasions Cake Art. I used Anna Griffin Silver Metallic cardstock on all the cuts. The 25th is from Tis The Season, and the flutes are from Solution Wedding Cartridge.

Thank you for stopping by my blog today!

Happy Crafting!
Colleen

Monday, November 18, 2013

Going Old School

I needed to make a Thinking Of You card for my dear friend's Mother-In-Law. She is in her late 80's and is in the hospital with pneumonia. I wanted to keep it simple, so I went back to basics. No machines, no cartridges, just me, a paper cutter, a punch, a Belles N' Whistles stamp and my copics. October Afternoon's Woodland Park Papers were perfect for the card. I inked around the edges with Tim Holtz Distress Ink, Bundled Sage. I added a couple of Pearl Embellishments and a bow. Simple, but heartfelt.


 I computer generated a sentiment, and will write her a special note on the other side of the card.


I made sure not to forget the back. 

It's been so long since I just made a card, and I really enjoyed this. 

Thanks for stopping by my blog today! 

Happy Crafting!
Colleen

Friday, November 15, 2013

It's All About The Mini

Hi Friends and Fellow Crafters! For the past 2 weeks I have been hard at work on this mini. I took the Masquerade Mini Class at Noel Mignon and I just loved it! Cassie over at Glue Meets Paper taught the class and she was great! She taught us wonderful techniques! I am very proud of this album and I hope that as the years go by, my great niece, Kaylee, enjoys seeing the photos from her very first Halloween! Warning, this post has LOTS of pictures! I am entering my book at the Fantabulous Cricut Challenge


Cassie showed us how to use polyurethane to strengthen our covers. She also introduced me to YES paste. It is a great adhesive. The front and back covers are super sturdy.


 Of course I had to break out my Cricut for some embellishments. How cute are the Cricut Bats?  They are from Simply Charmed.


Cricut's Rock Princess had the perfect Skulls for my book!


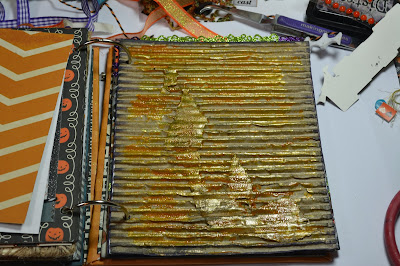
This page is from a ripped box. I used polyurethane on it to stiffen it, I inked the edges with TH Distress Ink, Black Soot and used Ranger Crackle Paint on it. Then for days, I tried picture after picture on it, and just couldn't bring myself to cover the whole page. I finally decided to not use a picture and I am so happy with the results. The glittered Raven is a wood embellishment that I used Glossy Accents and Martha Stewart Glitter on. So sparkly!


The pumpkin border and spider web corners seen on the other pages are from the Circle Cartridge, Paper Trimmings.


I love the pull out page. The material that was included in the Masquerade Mini Kit was fun and very cool. Cassie's idea for the page is super. It was fun trying new techniques and sewing on some pages. I was finally brave enough to break out the Janome Sewing Machine that I bought a few years ago to use on this book. Thank goodness it worked, as I think the warranty may have expired a couple of years ago! LOL! 


Such a cutie pie!


Autumn Celebrations Halloween Trick or Treaters added a fun touch to the page! 


I loved using the burlap to create a page. Cassie walked us through creating the page and using a Adirondak  Silver Paint Dabber.  I also made a Mini Flip Page for this album. I have never tried that technique either! Look at the tiny little witch! She is from the Circle Cartridge, Paper Trimmings.


I even used some of my Graphic 45! 


Kaylee and her big cousins looked adorable! 


Cassie also showed us how to use a border punch to make fun pages. I used a MS Spider punch on my page. I also used some Thickers Scrabble Tiles that I had in my stash. 


I LOVE this picture! I added an Anna Griffin Sentiment and a Pink Paislee flower that I spritzed with Heidi Swapp Color Shine in Amethyst and brushed some Ice Stickles on. Then some lace ribbon finished it. It's hard to see, but the flower is grungy and sparkly!


My niece texted me this cute picture on Halloween night, it was the perfect way to finish my book.


Back cover


Cassie taught a phenomenal class and Noel Mignon's kit was jam packed with goodies. Well worth the money I spent on it. Not only did I use the kit supplies, but I got to use much of my other Halloween stash. This book is filled with October Afternoon Witch Hazel goodies, Theresa  Collins papers, some that came with the kit and some I had on hand, Anna Griffin Embellishments, Graphic 45 and Cricut cuts. It took me some time to finish it, but it was well worth it! Now I am ready to take on Christmas! 

Thanks for stopping by my blog today! 

Happy Crafting!
Colleen

Friday, November 1, 2013

Hello, It's Me...

It's been a very long time since I have done any posting. So much has happened in my life, that I just haven't had the time to blog.

On September 11, 2013, my Mom passed away at the age of 81. She died very peacefully here at home surrounded by my husband, son, her cat, and myself. My Mom was a wonderful person. She was strong, dedicated to her family and friends, funny, loving and could massacre the English language like no other person I have ever known. LOL! She was an animal lover and loved to shop. My Mom was born in Brooklyn in 1931, and no matter how far she lived from Brooklyn, you knew that was where she came from. Most of all, she was devoted to my son. I swear he was her reason for living.

She beat several heart attacks, a triple by-pass, kidney failure, emphysema and she almost beat Alzheimer's. She was also dealing with a broken hip since last February. We had pins put in, but I know the hip still gave her trouble.

She came to live with us 11 years ago. She had a heart attack and the doctor who treated her in North Jersey said she needed a by-pass, but they wouldn't do it because they discovered she had emphysema. Instead, they used stents to unblock her arteries. Since she lived by herself, I said she needed to come to stay with us to recuperate. I picked her up from the hospital September 11, 2002. She was supposed to stay for 4-6 weeks. she stayed until September 11, 2013. Life has a habit of coming full circle, doesn't it? We were lucky to have had her with us.

So since September 11, I have been wandering through a hazy life. Not sure of who I am anymore. I have always been my son's caretaker, but even with the Autism, he has been growing more independent each day. I am so proud of him. I gave up my job when my Mom was diagnosed with Alzheimer's Disease about 5 years ago. I became her caretaker. It was a full time job. There were doctor's visits, taking her to her senior groups, taking her shopping, watching old movies with her and just spending time with her, It was a wonderful and sometimes difficult 11 years. We had dinner together every night until she became bedridden in May. My husband would tell her a joke every night and the four of us would laugh. I cherished our family meals. Towards the end, I would eat dinner with my Mom and my husband would come in to tell her the joke of the day. She may not have understood them, but she still laughed. She adored my husband.

We have been trying to move on. My son is non-verbal, so we have been trying mostly to help him cope. We have been seeing an increase in his self-injurious behaviors and he loses his patience quicker than usual. I know this is because he misses my Mom so much. He would tuck her in at night and blow her kisses. He did this almost every night. It was beautiful.

I miss her. I have been crafting and will share some of my projects that I have made over the next few weeks. I am considering using her old room as my craft room. Right now, it is still Nana's room. We are trying to maintain as typical a life as we can for our son. We put up the decorations for Halloween, although not as much on the inside of the house as we usually do, and we continued in our tradition of watching the classic horror movies in the week leading up to Halloween. My mom loved Halloween, she would get such a kick out of seeing the little children all dressed up in their costumes and coming up the leaf covered walkway to our door for candy. She was still young at heart, even dressing up for parties at her senior groups.


I love this picture of my Mom and one of her dearest friends, Betty. I used my October Afternoon Witch Hazel stash. It was odd for me not to use any Cricut cuts on a project. It is bittersweet to finish a layout or project and not bring it to my Mom to look at. She started me down this road of paper crafting and supported me right until she died. I have to believe that she is still cheering my artistic endeavours on from above and that one day, we will all be together telling corny jokes.

Nice to be back again.

Happy Crafting!
Colleen

Thursday, September 5, 2013

October Afternoon and Webster's Pages are partnered!

This just in from Webster's Pages and October afternoon! I am sharing their post for a chance to win 6 months worth of goodies! 


A New Partnership! Webster's Pages & October Afternoon

Sunday, September 1, 2013

It's A Back To School Challenge

Hi friends and fellow crafters! Can you believe it's September already? I know I can't. Over at the Cricut Circle message Boards the weekly challenge is to create a school related project. One of my oldest and dearest friends is a teacher starting back to school so I decided to mail her a card wishing her a happy school year!


I used the CCR Classroom, August & September Exclusive for the chalkboard. The stamp is from Saturated Canary and she is called Geekin' It, I just love her! I colored her with copics and used Ranger Glossy Accents on her glasses and the apple on her head. I had those glasses in high school and I was geek, so I suppose that's why I love this image so much. LOL! I popped her up on the card. The cute "nerd-a-licious" stamp is from The Sweet Stamp Shop and is from the stamp set Geek Chic and it just so happens to be on sale now! I stamped it using Ranger Adirondack Lights, Snow Cap. It's a pigment Ink. I like the way it looks like chalk. Speaking of chalk, I used DCWV Chalkboard cardstock for most of the layers on this card.  I distressed the edges of the cardstock with my scissors for some texture. The cute little apple is from the new Cricut Cartridge, Create A Friend. It was a leftover cut. I also used Create A Friend for the inside of the card.


I used paper from My Mind's Eye, Lost and Found for the inside of the card, I also distressed that paper, too. I did a little scratching on the #1 Teacher so that it would look like an old worn chalkboard.

She really is a great teacher and works very hard to see her students succeed. I am so proud to call her my friend and I hope she enjoys the card when she receives it.

Happy September to all!

Happy Crafting!
Colleen

Tuesday, August 27, 2013

Charmed Cartridge, The Battle Is On!

Hi friends and fellow crafters! It's time for most of the Cricut Circle Original Members to renew our memberships. There have been many changes over the past 3 years, but one thing remains, the passion the Circlette's have for a new Circle Cartridge, and that is in full swing on the Circle message boards. It started with a few members discussing which image is better, the Pig or the Bear and escalated into a full on challenge to show our stuff.

I love the Bear. Not that the Piggy isn't "squeally" cute, it is. I just haven't created anything with it yet, lol! I went right for the Bear and made myself a layout of my sweet Great Niece, Kaylee. I just love my little girl so much, and my layout says it all.


This is an 8x8 layout. The papers are from DCWV Nana's Nursery and brown cardstock from my stash. I used the CCR to create the layout, so I cut a couple of extra hearts from Charmed to use as embellies on the corner of the page. The {heart} You is also from Charmed and was a perfect title. So simple and fun.


How can you not love this bear? It's simply the "Beary" best! I used glossy accents on the bear's heart and added some DoodleBug Sugar Glitter. I added chalk on the cheeks, little beads for eyes and gingham bow complete my teddy. Sooooo cute!

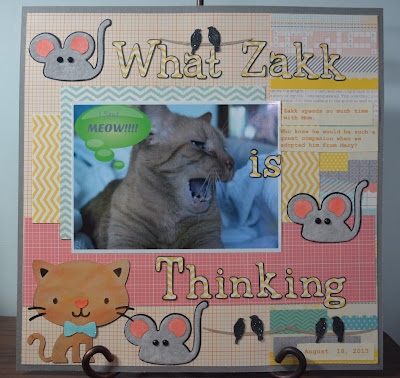
While the Bear and Pig are cute, there are other great cuts on the Cartridge, like the Mouse! Another simple cut that is so fun to use. I was going to make a Pig, but the Mouse was just begging to come out and play. I have been getting to know my new camera and taking lots of pictures of my cats. I caught this shot of Zakk when he was laying on my Mom's bed by her.


I came across a stack of paper in Michael's that may or may not have been hidden under some Simple Stories. What is craft store etiquette on that? Do you leave the stack or take it if you really love the papers? I did go and look to see if there were anymore of that stack, but I couldn't find any. Was I bad?
The papers are fabulous, the stack is called Sunday Afternoon and the stack is full of wonderful chevrons, polka dots, subway art, crossword papers and plenty of foil and glitter papers. I used a piece of grey DCWV solid cardstock for the base of my layout and all the rest of the papers are from the Sunday Afternoon Stack. Enough about the paper, this is supposed to be about the Mouse. :D


The Mouse Rocks! I cut 4 of them and flocked the top layer with Ranger Grey Flock. I cut the ears in white cardstock and colored them with Copics and used the same black breads on the eyes that I used on the Bear. They are the cutest! I cut the kitty from Create A Critter and used chalks to add some orange and brown markings to it. I colored the bow with Copics, then covered it with Glossy Accents and Stickles Glitter.


The birds are from CTMH Artbooking. I love all the little gems on this cartridge. My very crafty friend Belinda sells CTMH, contact her for a great deal on this cartridge. If you don't own it yet, you need it! I cut the birds in black cardstock and the base in kraft cardstock. I used the Glossy Accents and Stickles Glitter on them too.

Did I say how much I LOVE the font on the Charmed Cartridge? It is nice and smooth to cut. I used a dark grey cardstock for the shadow and some bright yellow chevron paper from The Sunday Afternoon Stack for the layers. I think it's a perfect fit for the layout.

Finally, I added some computer generated journaling and my layout was finished. I really like how it turned out.

Thanks for stopping by my blog today!

Happy Crafting!
Colleen

Saturday, August 10, 2013

Hello Sunshine

Hi friends and fellow crafters! I finally had the chance to play with my new Close To My Heart Artbooking cartridge. I got a great deal from my friend Belinda. If you still haven't gotten this cartridge, stop over by Belinda's CTMH page and place an order with her!


I used the CCR to resize the overlay from the letter T to full page size. I cut the Sunshine Pennant from the letter T in blue Cricut Cardstock. I added a sun brad to dot my "I". I also hid the contours on the sunshine pennant and cut 2 pennants in bright green DCWV cardstock. Hello is from the title button on the overlay for the letter S. The birds are from a package of stickers by K&Company. I also added a ticket sticker that says, you are my sunshine. I added some fun little silver stickers to the sun and pennants.


I created this layout for a weekend challenge over on the Cricut Circle Message Boards. The challenge was create something "sunny". I used a favorite picture from our honeymoon of my hubby for the layout.

I can't wait to create some more projects using this cartridge.

Thanks for stopping by my blog today.

Happy Crafting!

Colleen 


Tuesday, August 6, 2013

Cricut Circle Cartridge Monthly Challenge

Hi friends and fellow crafters! Today I am sharing a layout that I created with the Cricut Circle Exclusive Cartridge, Letter Envy. We have been challenging ourselves on the message board to use the Circle Cartridges for a full year. We are now half way through the challenge and this is my third month using Letter Envy. When we first started, we were originally going to try to use one cartridge for the full year, but many of us found we were losing creative juices and needed a switch, so we decided to change the challenge to one cartridge for 3 months. I have to admit that this was a very challenging cartridge to use. I generally like my fonts to have one layer and a shadow. The fonts on this cartridge were very frilly with little thin layers. My Cricut Mini did a great job cutting the thinnest layers.

Since my Great Niece, Kaylee Ann was born, I have been all about little girl papers, embellies, layout ideas, etc. This is one of those layouts. It is a picture of my Great Niece, Kaylee Ann and her Mom, my niece, Holly, right after Kaylee's birth. When I saw this picture, I knew it was perfect for the Letter Envy font.


I used paper from my DCWV Collage Art Stack that I found in Michael's. This paper is so interesting. It does so much of the work for you. I love the look and feel of this paper. The hummingbirds are from Maya Road and I sprayed them with Heidi Swapp's Color Shine. I used Peach, Mustard and Red Cherry. Then I took Ranger Glossy Accents and added Martha Stewart Coarse Glitter on top of the hummingbirds. The ribbon is from Recollections. The blue embellishments are from Webster's Pages. At the top corner, I used flowers from Recollections and a tulle flowers from Webster's Pages. The embellishment on the corner of the picture is from K&Company.

I cut the letters and frame using the CCR and my Cricut Mini. I love this little cutting machine because of the ability to move it so easily from one room to another. I created this layout while sitting with my Mom in her room. She enjoyed watching me put the layout together.

The letters are cut with paper from the Collage Art Stack. I cut This Is at a little under 2 inches and the word Love is cut at 2.25 inches. I wanted a frame around the picture, so I used a layer from one of the crests on Letter Envy to create it.


I offset a piece of yellow paper from the stack behind my photo and added the layer from a crest on Letter Envy. I like how it came out. Sorry about the reflection on the picture.


I had a wonderful visit with my Nephew, Holly and Kaylee on Saturday. It's been so long since I just sat and rocked a baby, it was heaven. I am still amazed the my nephew is a Daddy. He is a wonderful one too. 


I'll be back later this week with some layouts from my visit. 

Thanks for stopping by my blog today! 

Happy Crafting!
Colleen